
You have a high bounce rate? That is not automatically bad!
Users find your website after a search query, get the information they are looking for and then leave the site again. In Google Analytics this is evaluated as jump or bounce. We show you how to measure the time even on the exit page of a session with the Google Tag Manager and thus better interpret your bounce rate.
Google Analytics is one of the most popular tracking tools and is based on page views by default. The following information is therefore automatically included in the reports:
So here we already have the measured value “Time on page”, which is what we are now going to talk about.
But you need to understand how this time is measured to know how to interpret it.
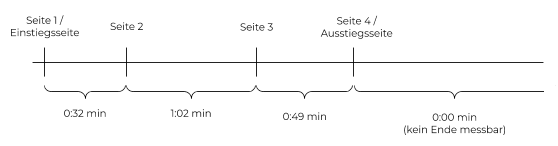
As soon as a user opens a page where we have embedded our tracking pixel, a page request is registered and sent to Google Analytics. At the same time a kind of stopwatch is started.
If the user then calls up a new page, Google can calculate the end of the “time on page” for the previous page. The call of a second page is therefore existentially important to transmit this measured value.
Only the time on the last visited page of a session cannot be determined by Google. Because when leaving the website, our tracking pixel is no longer triggered. By default, the session is then terminated after 30 minutes of inactivity. In Google Analytics we see the URL of the page as the “exit page”, but the measured value “time on page” is no longer included by the exit pages.
We now know that not every page visited can automatically measure the time spent on the site.
But if your website is very informative, it happens more often that users search for a question on Google, come to your site, get the answer to the question in your blog and then leave your website. The consequence:
The user is counted as a jump (has left the page without further interaction) and since the first page was also the exit page, the measured value “time on page” is set to 0:00 min.
This is not satisfactory. Instead, as a web analyst, I would like to know how long the users were on the article and at the same time define that users who were on the page for more than e.g. 60 seconds are no longer counted as a jump. To achieve this, we can use the Google Tag Manager to add a timer that measures the time spent on the page and at the same time triggers an interaction after 60 seconds so that no jump is detected.
How we can integrate the timer, I will show you in the following step by step instructions.
The only requirement is that you have a Google Tag Manager container on your site.
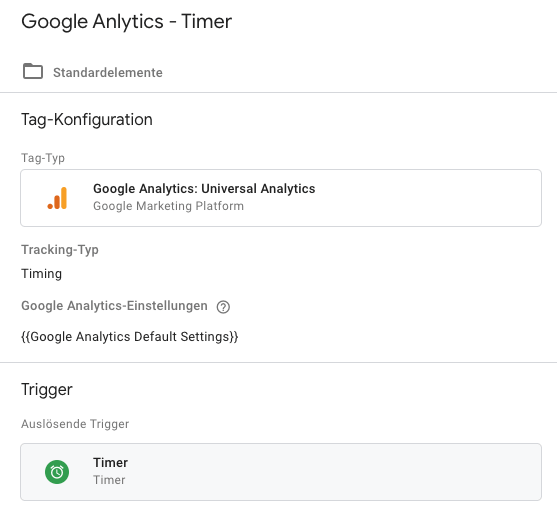
First of all a timer tag is created. The following settings have to be made for the tag:
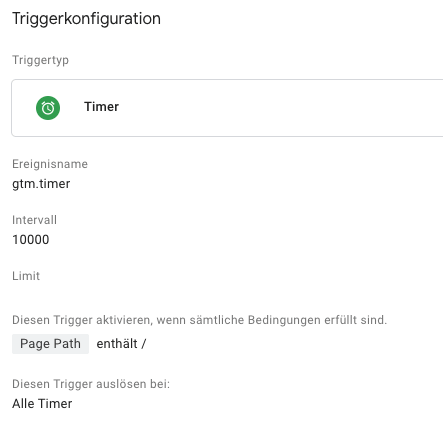
The “Timer” trigger can be defined as follows. In the example it triggers every 10 seconds (10,000 milliseconds). The limit is left blank, so there is no maximum number of times the day may trigger. In the condition either a certain range can be defined or via “Page Path” contains “/” the trigger can work without any limitation.
If this is set up so far, we can see in the preview mode that an event called “Timer” is now triggered every 10 seconds.
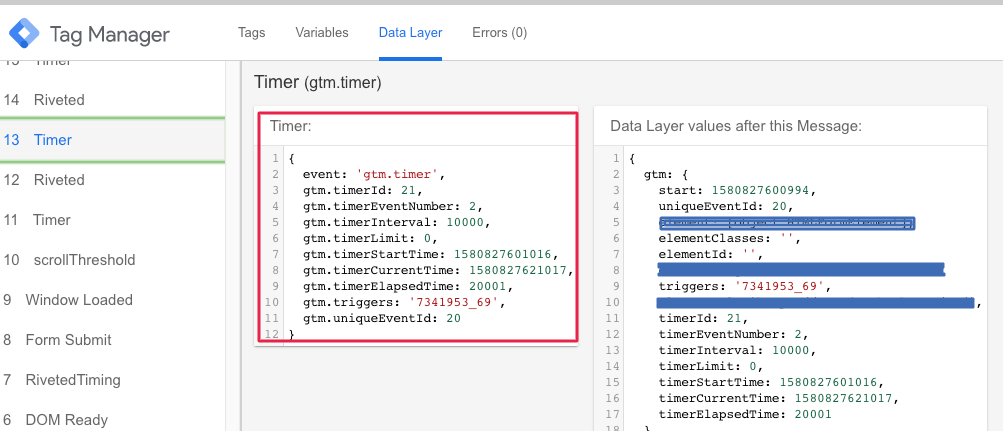
The DataLayer collects the following data for each event:
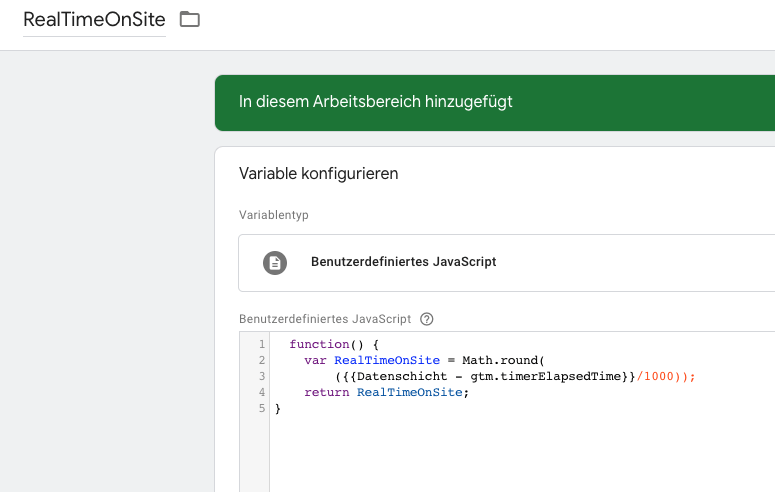
The relevant value for us is gtm.timerElapsedTime. To use this value as a variable, we have to create a variable of type data layer variable:
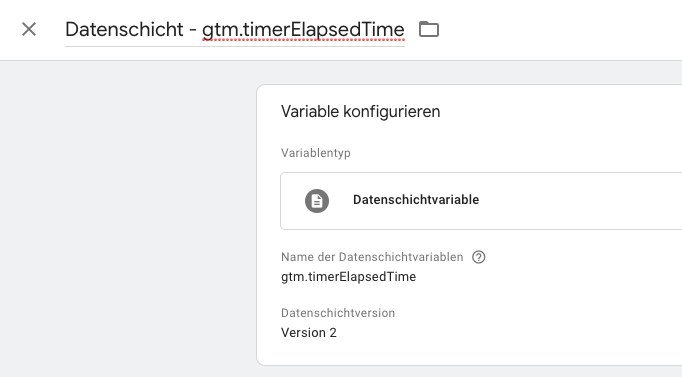
However, since the time collected over it is given in milliseconds and therefore looks a bit unwieldy in the Google Analytics report, this value should be converted to seconds and rounded to the full digit. Instead of 10,007 milliseconds, 10 seconds will then appear in our report.
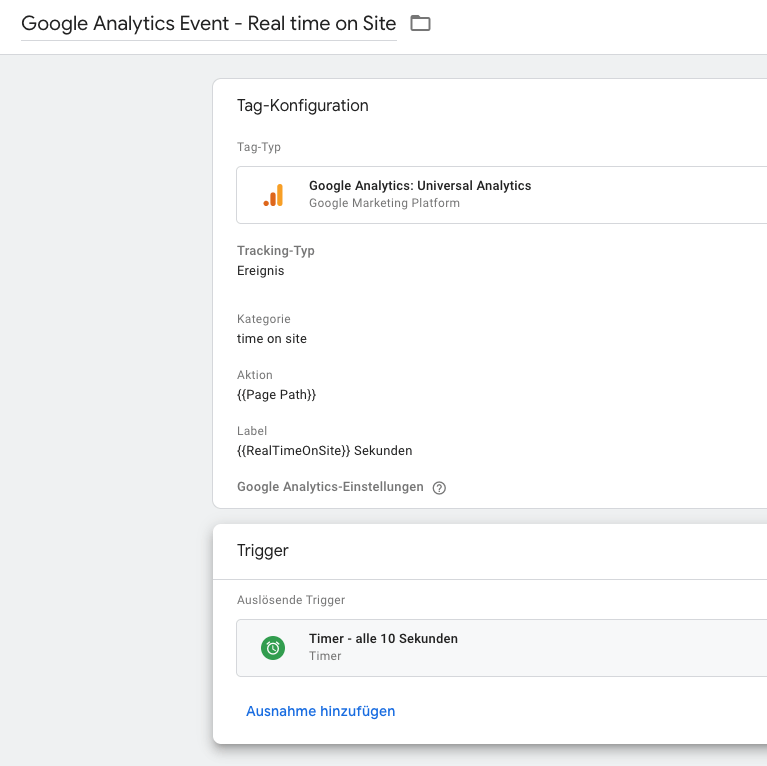
With all this information we can now build an event tag, which gives us the measured time per page.
Important: The field “Hits without interaction” within the tag settings should be set to “True” (or True), because otherwise we will resolve the bounce rate already with the first triggering of the tag (this corresponds to a transmitted interaction) and the bounce rate would not be meaningful in the future.
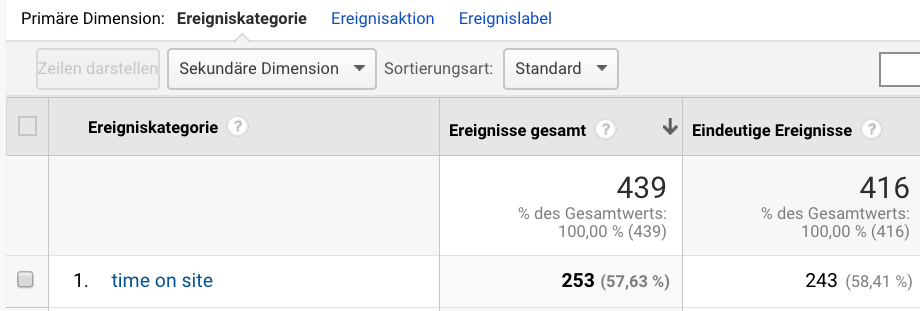
In Google Analytics we can now see the corresponding values in the report in the “Behavior” Section → “Events” → “Most Important Events”.
As explained at the beginning, a jump is always measured as such when a user calls up a page and leaves it again without interaction (which is sent to Google).
If you have a website where there are a lot of articles that users read through and then don’t stay on the page, then the bounce rate is often higher than it should be.
Here you have the possibility to trigger an event after 60 seconds (number freely selectable) of time spent on the page, which ensures that the user, who is obviously very interested in the article, is not considered to have left.
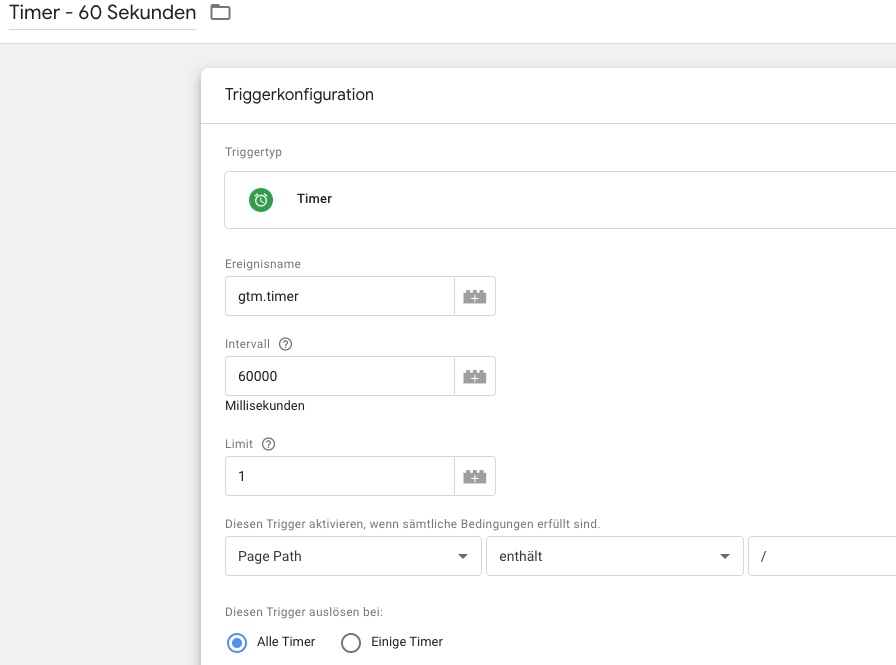
For this purpose we create a trigger that explicitly triggers after 60 seconds. Since this should only happen during the first 60 seconds, the limit should be set to 1:
Next, we create a tag that sends a hit to Google Analytics.

It is important that the field “Hits without interaction” is set to “False” (or false) here. The previously created 60 seconds timer is added as trigger.
With the publication of this tag, all visitors who are on a page for more than 1 minute will now no longer be registered as jumping off, even if they do not trigger any further interaction on the page and leave the website again.
Conclusion: It is important to always read the figures in Google Analytics carefully and to know how the individual measurements are arrived at.
We hope the article could explain to you how the measured value “time on page” is tracked by Google and how this measured value is related to the bounce rate.
If you have further questions about tracking or KPIs in Google Analytics, we are looking forward to your message.